
Remoteer Kullanım KılavuzuRemoteer User Guide
Bir bilgisayara uzaktan bağlanmak, ona bağlanılmasına izin vermek ve dosya ya da servis paylaşmak için bilmeniz gereken her şey. Resimler uygulamanın kendisinden alınmıştır. Everything you need to connect to a computer, let others connect to yours, and share files or services. The pictures are of the app itself.
1. Kurulum ve ilk açılış1. Install and first start
- İndirilenler bölümünden Mac (.dmg) veya Windows (.exe) kurulumunu indirip açın. Mac'te Remoteer'i Uygulamalar klasörüne sürükleyin.
- Remoteer'i açın. Uygulama kendini güncel tutar: yeni sürüm, oturum yokken arka planda kurulur.
- Mac'e bağlanılacaksa macOS iki izin ister: Ekran Kaydı (ekranın görüntüsü için) ve Erişilebilirlik (fare ve klavye için). Uygulama eksik izni üstte gösterir; düğmeye basıp Sistem Ayarları'nda Remoteer'i açın. Yalnızca başka bilgisayarlara bağlanacaksanız bu izinler gerekmez.
- Download the Mac (.dmg) or Windows (.exe) installer from Downloads and open it. On a Mac, drag Remoteer into Applications.
- Open Remoteer. It keeps itself up to date: a new version installs in the background while no session is on.
- If others will connect to a Mac, macOS asks for two permissions: Screen Recording (for the picture) and Accessibility (for mouse and keyboard). The app shows a missing permission at the top; press its button and turn Remoteer on in System Settings. You don't need them just to connect to other computers.
2. Bu bilgisayarın numarası ve PIN'i2. This computer's ID and PIN
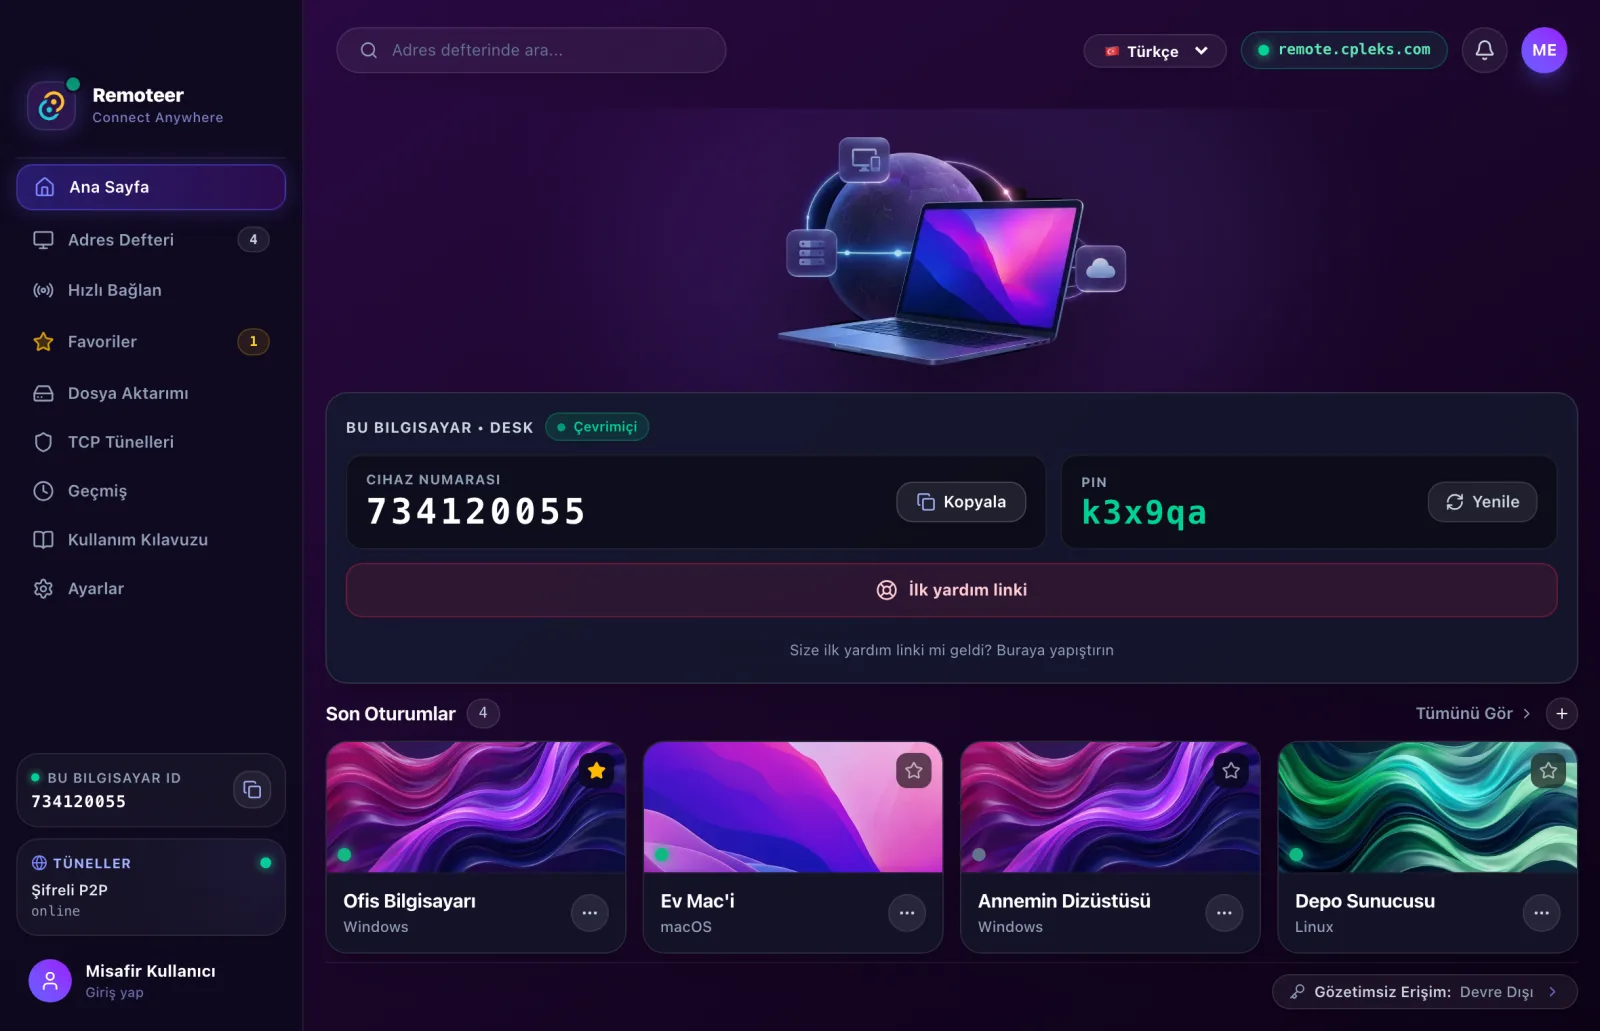
- Cihaz numarası bu bilgisayarın adresidir; değişmez. Size destek verecek kişiye bu numarayı söyleyin (Kopyala).
- PIN numarayla birlikte girilen kısa koddur. Yenile yeni bir PIN üretir ve eskisiyle bağlanmayı bitirir.
- İlk yardım linki: bilgisayarı olmayan birine, sizin bağlanabilmeniz için tek kullanımlık bir link gönderirsiniz (Pro).
- Son oturumlar: kayıtlı bilgisayarlarınız; yeşil nokta çevrimiçi olduğunu gösterir. Karta tıklayınca bağlanırsınız.
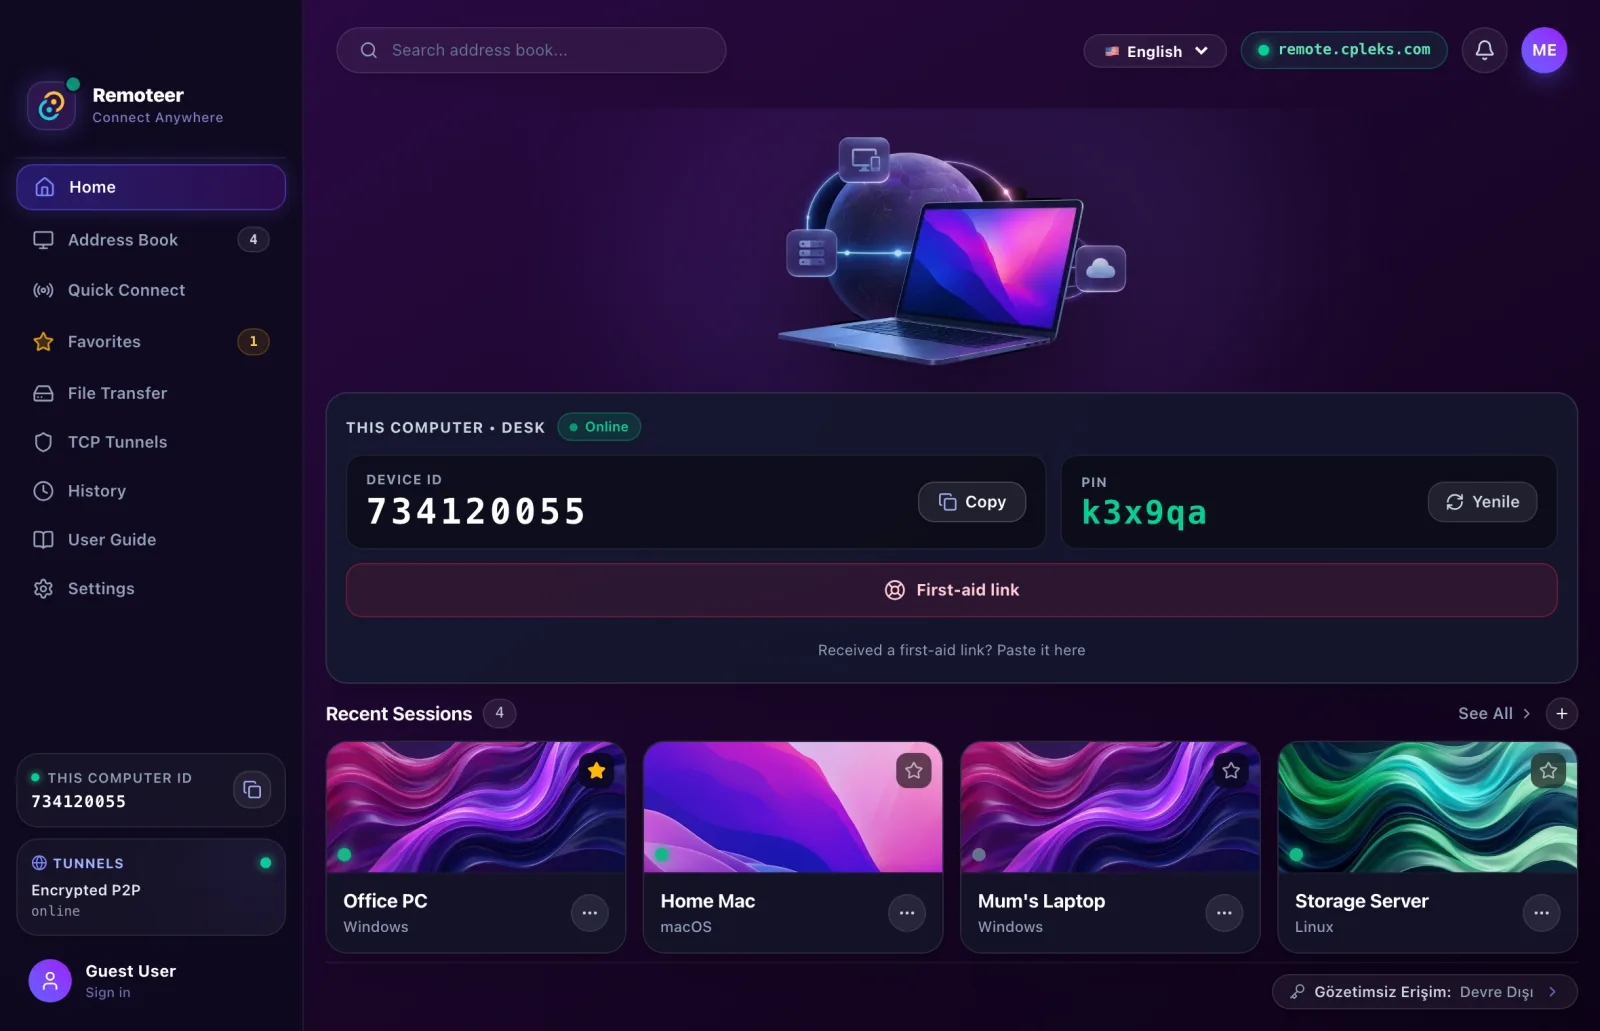
- The device ID is this computer's address; it never changes. Tell it to whoever will help you (Copy).
- The PIN is the short code entered with the ID. Refresh makes a new one and ends access with the old one.
- First-aid link: send a one-time link to someone who doesn't have the app, so you can connect to them (Pro).
- Recent sessions: your saved computers; a green dot means online. Click a card to connect.
3. Başka bir bilgisayara bağlanmak3. Connecting to another computer
- Hızlı Bağlan'a karşı bilgisayarın numarasını yazın (veya adres defterinden seçin) ve Bağlan'a basın.
- PIN'i biliyorsanız girin. Bilmiyorsanız karşı taraf bir istek görür ve kabul eder.
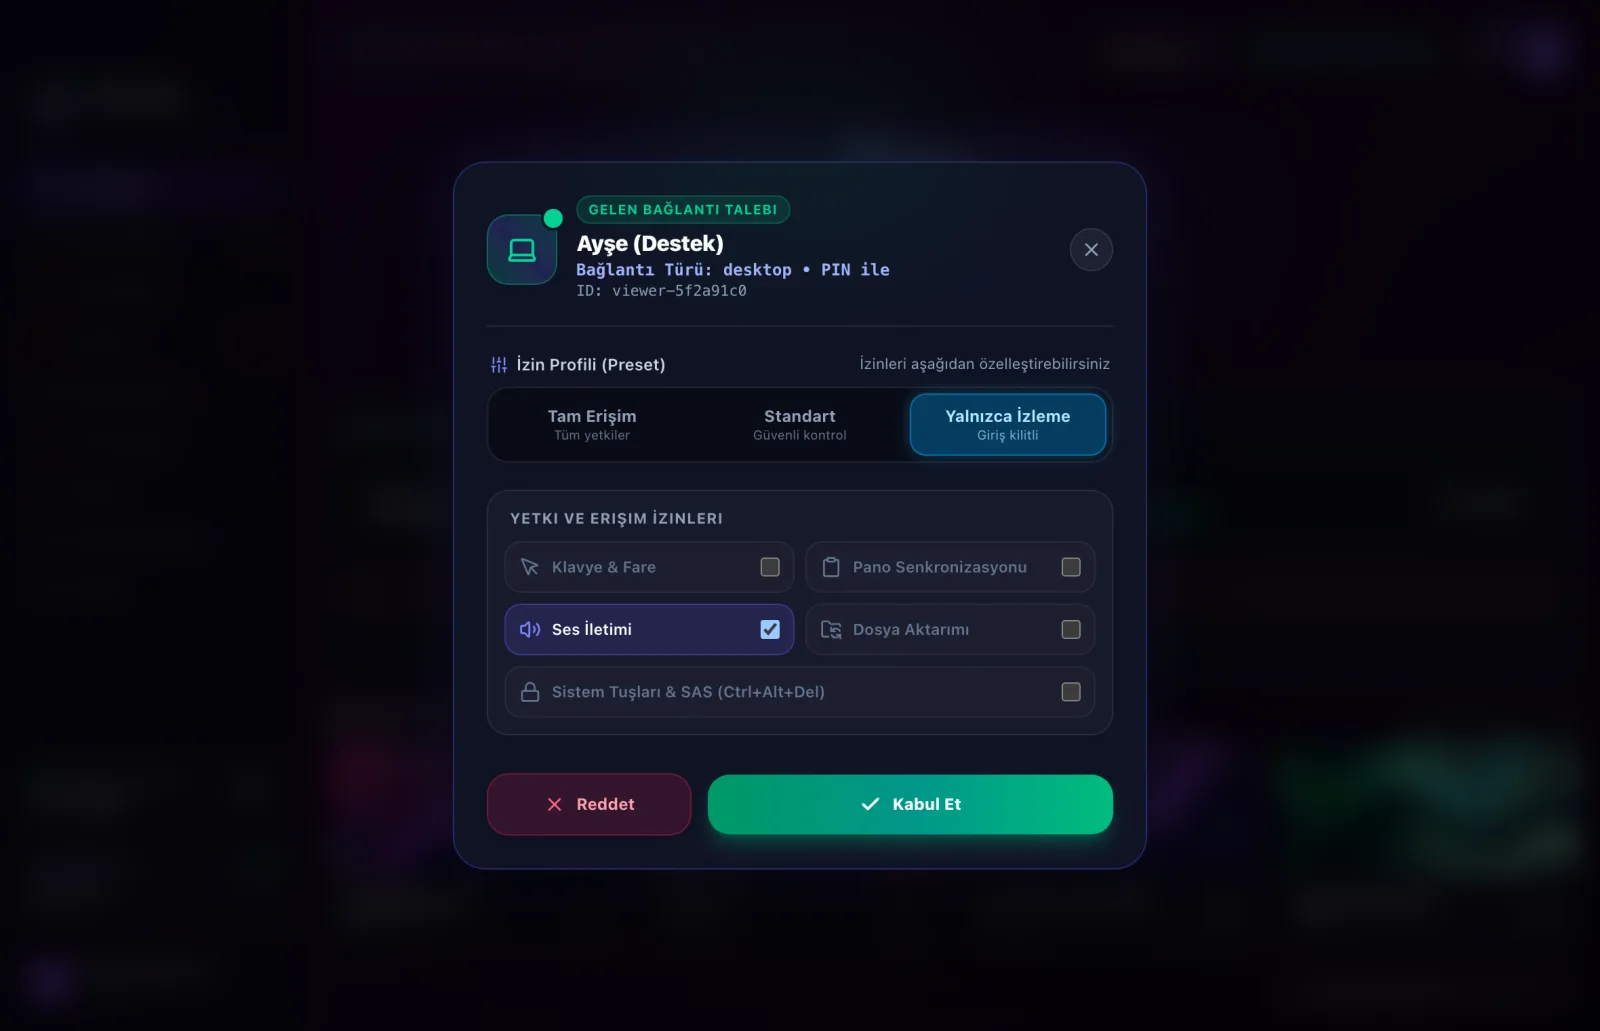
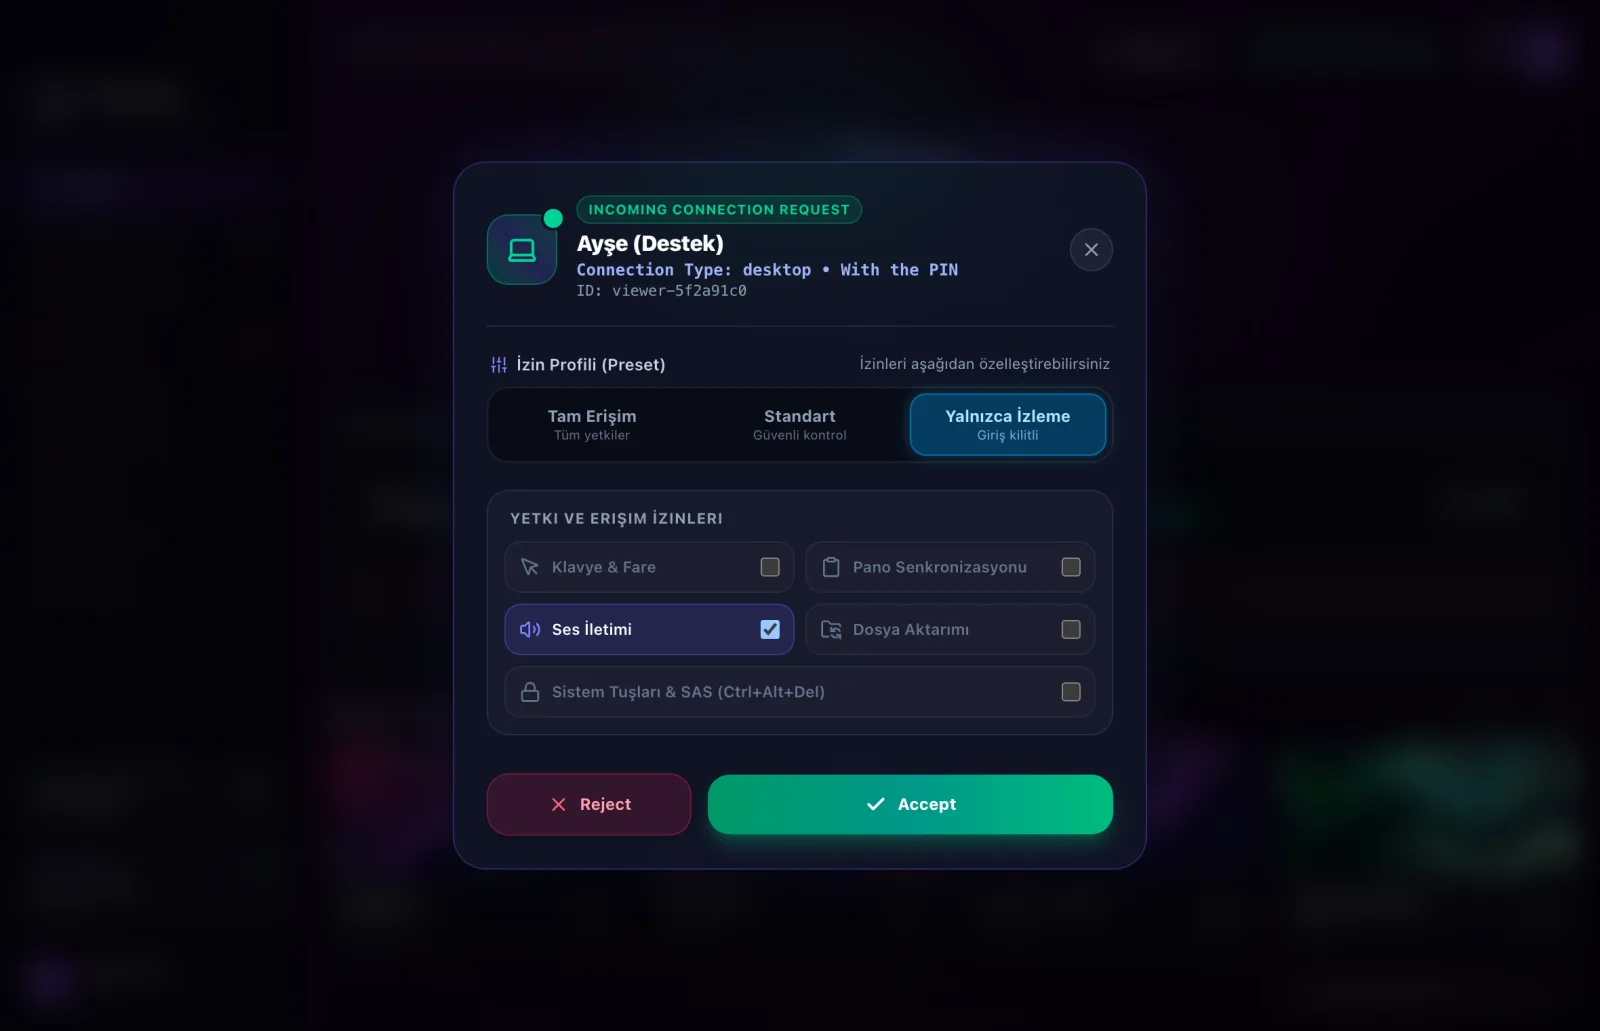
- Karşı taraftaki kişi neye izin vereceğini seçer: Tam Erişim, Standart veya Yalnızca İzleme; tek tek izinleri de açıp kapatabilir.
- In Quick Connect, type the other computer's ID (or pick it from the address book) and press Connect.
- Enter the PIN if you know it. If not, the other side gets a request and accepts it.
- The person there chooses what you may do: Full access, Standard or View only, and can switch each permission on or off.
4. Oturum çubuğu4. The session bar
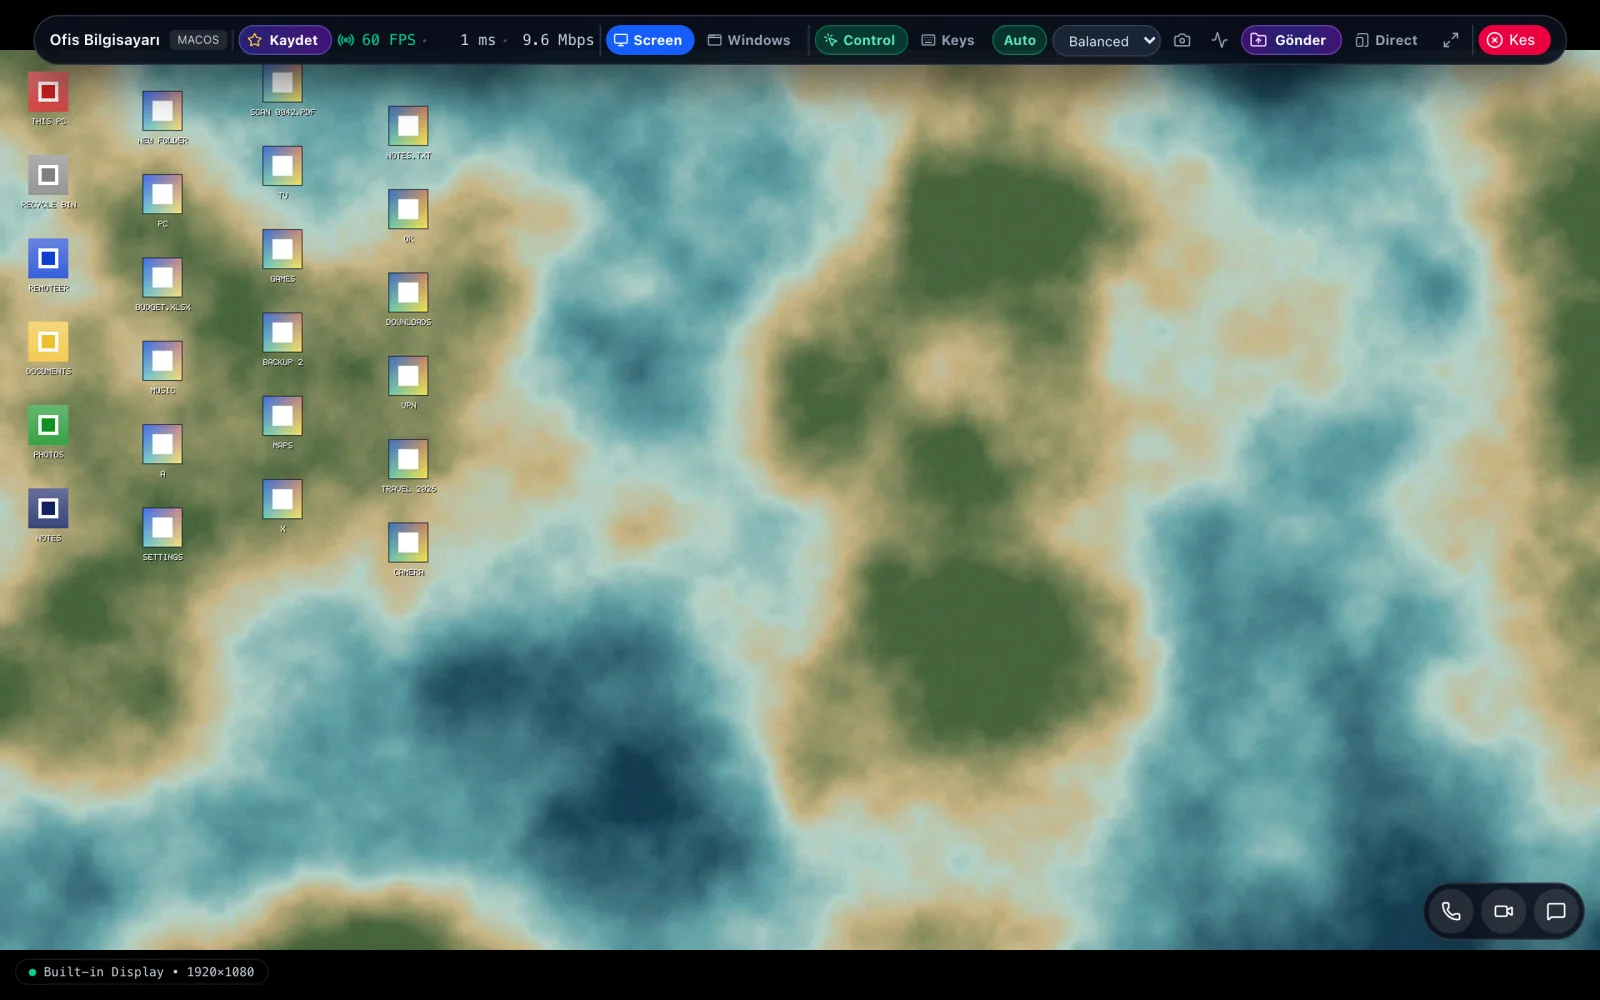
Kaydet bilgisayarı adres defterine ekler.
60 FPS · 9.6 Mbps akışın o anki durumudur.
Screen / Windows: tüm ekran veya tek bir pencere.
Control fare ve klavyeyi açar/kapatır; Keys özel tuşları (Ctrl+Alt+Del gibi) gönderir.
Auto kaliteyi bağlantıya göre ayarlar; yanındaki menü Speed / Balanced / Quality seçer.
Kamera simgesi ekran görüntüsü alır; dalga simgesi bağlantı ayrıntılarını gösterir.
Gönder dosya aktarım panelini açar.
Kes oturumu bitirir. Sağ alttaki düğmeler sesli/görüntülü arama ve sohbet içindir.
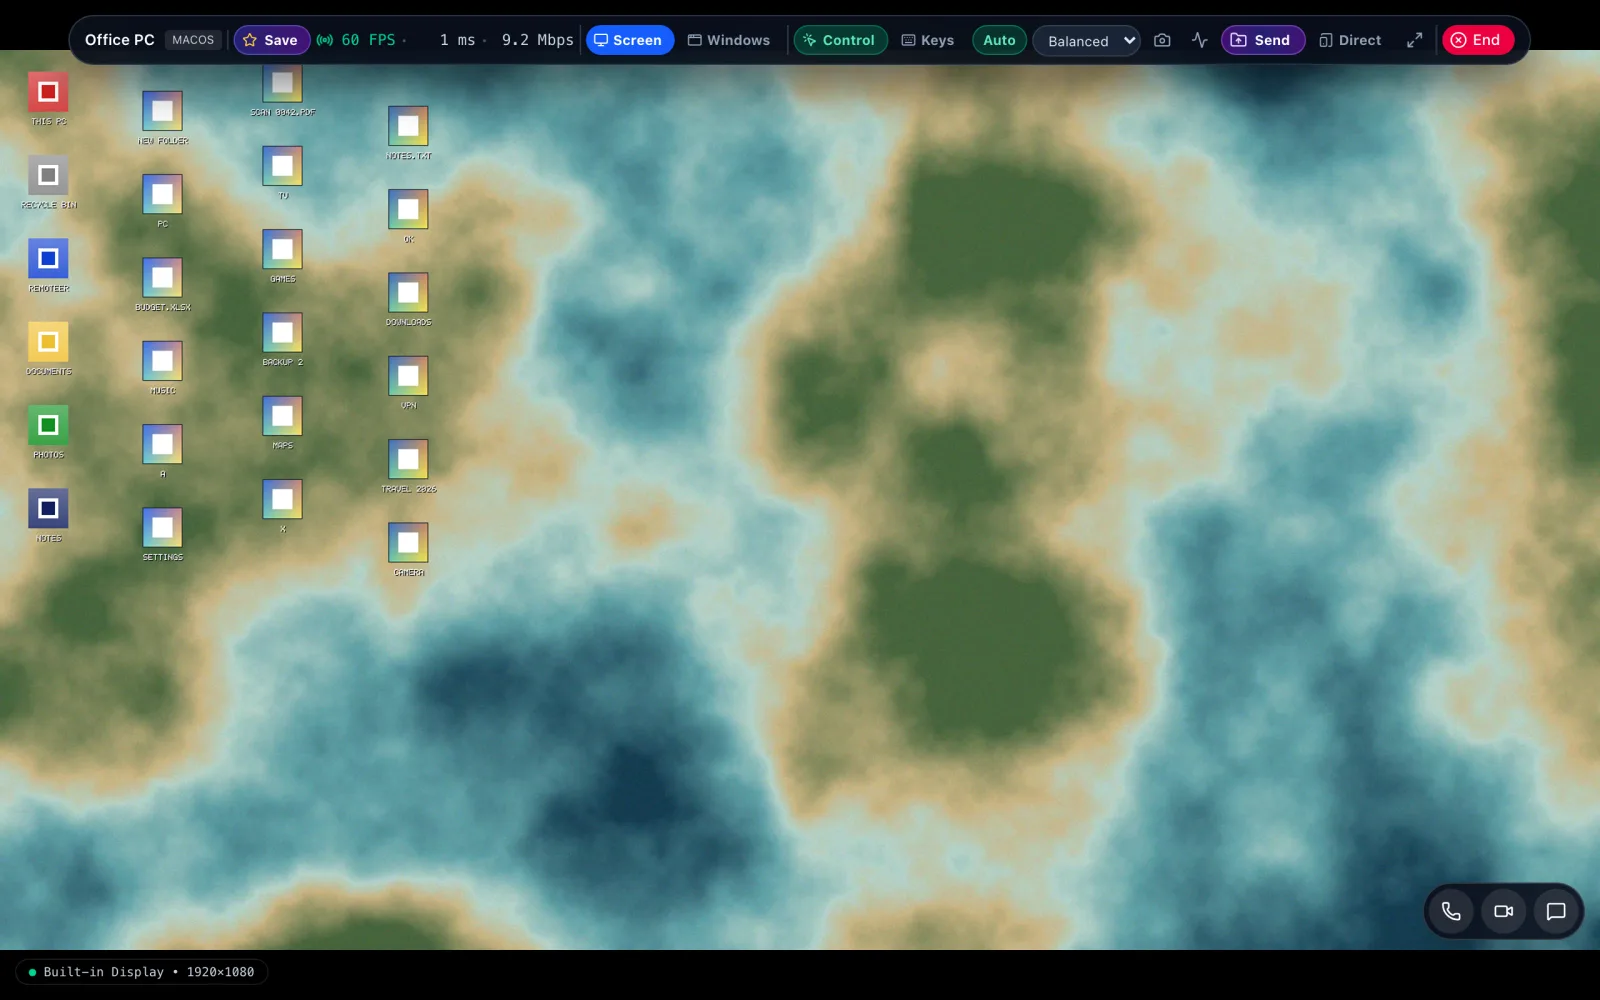
Save adds the computer to your address book.
60 FPS · 9.6 Mbps is the stream right now.
Screen / Windows: the whole screen or one window.
Control turns mouse and keyboard on or off; Keys sends special keys (such as Ctrl+Alt+Del).
Auto adapts quality to the connection; the menu next to it picks Speed / Balanced / Quality.
The camera icon takes a screenshot; the wave icon shows connection details.
Send opens the file transfer panel.
End ends the session. The buttons bottom right are for voice and video calls and chat.
5. Bilgisayarınıza bağlanılınca5. When someone connects to you
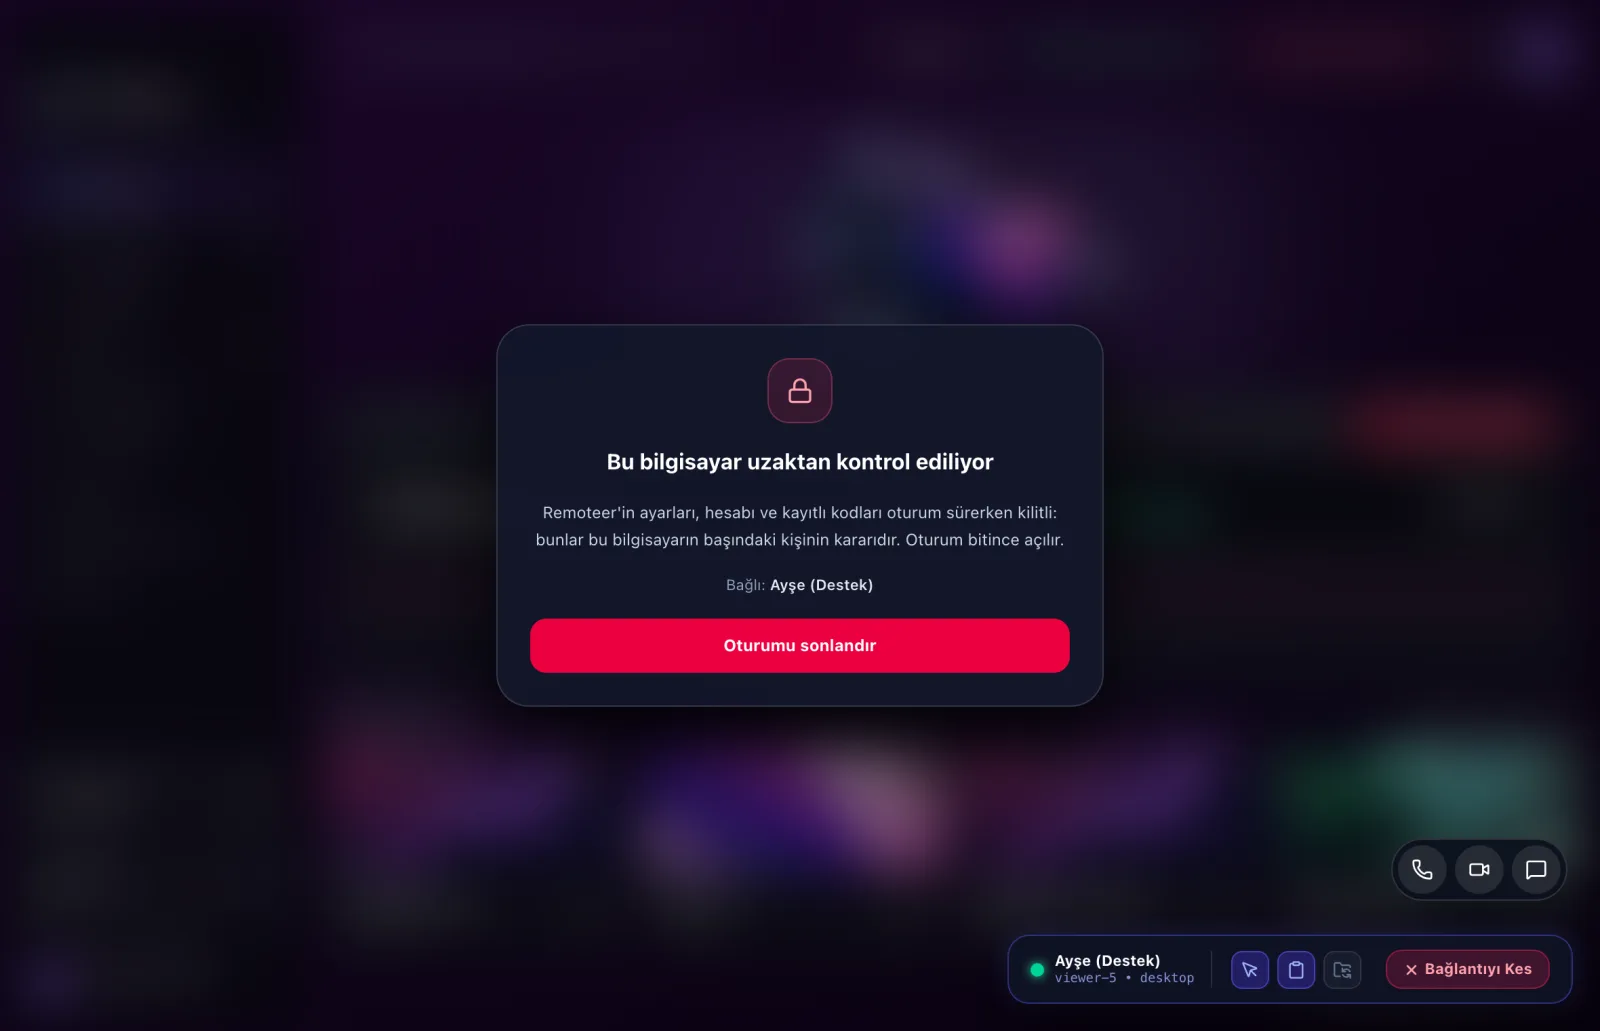
- Bağlı kişi Remoteer'in ayarlarını, hesabınızı ve kayıtlı kodlarınızı göremez ve değiştiremez: pencere oturum boyunca kilitlidir. Bunlar sizin kararınızdır.
- Sağ alttaki kutudan izinleri canlı açıp kapatırsınız (fare ve klavye, pano, dosyalar). İzin vermek yalnızca bilgisayarın başındaki kişiye aittir; uzaktan yapılan tıklamalar sayılmaz. İzni geri almak ve Bağlantıyı Kes her zaman çalışır.
- Oturum bitince her şey açılır.
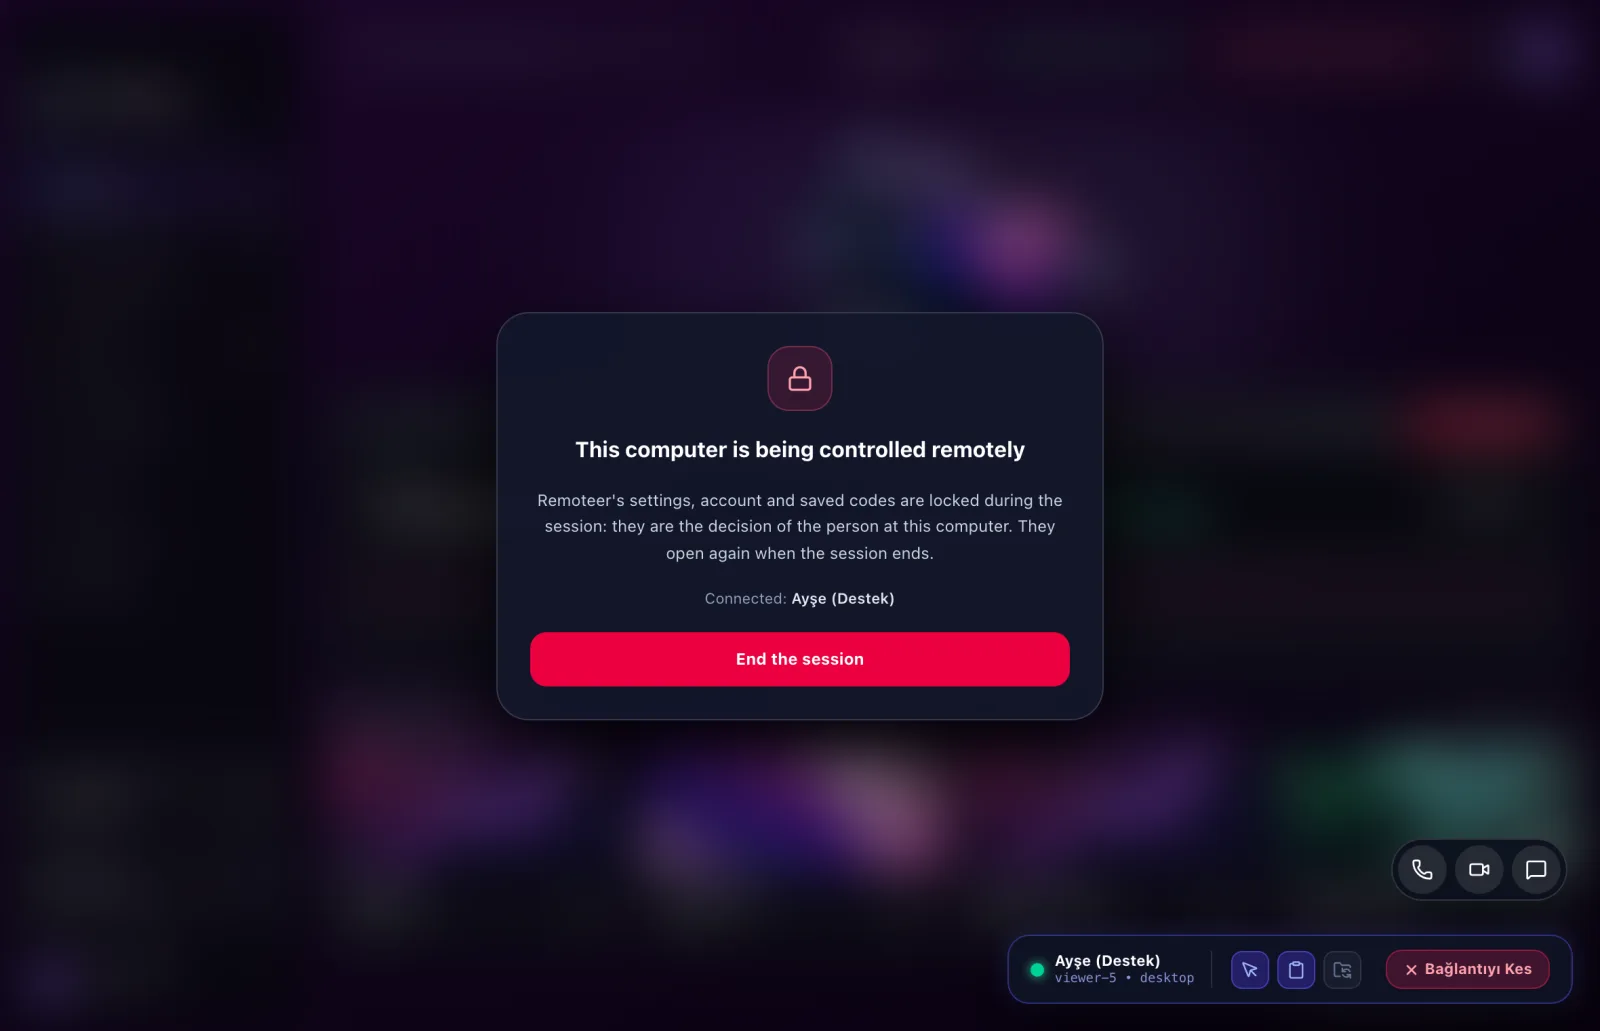
- The person connected cannot see or change Remoteer's settings, your account or your saved codes: the window is locked during the session. Those are your decisions.
- The box bottom right switches permissions live (mouse and keyboard, clipboard, files). Granting one is only for the person at the computer; clicks from the remote side don't count. Taking one away and Disconnect always work.
- Everything opens again when the session ends.
6. Adres defteri6. Address book
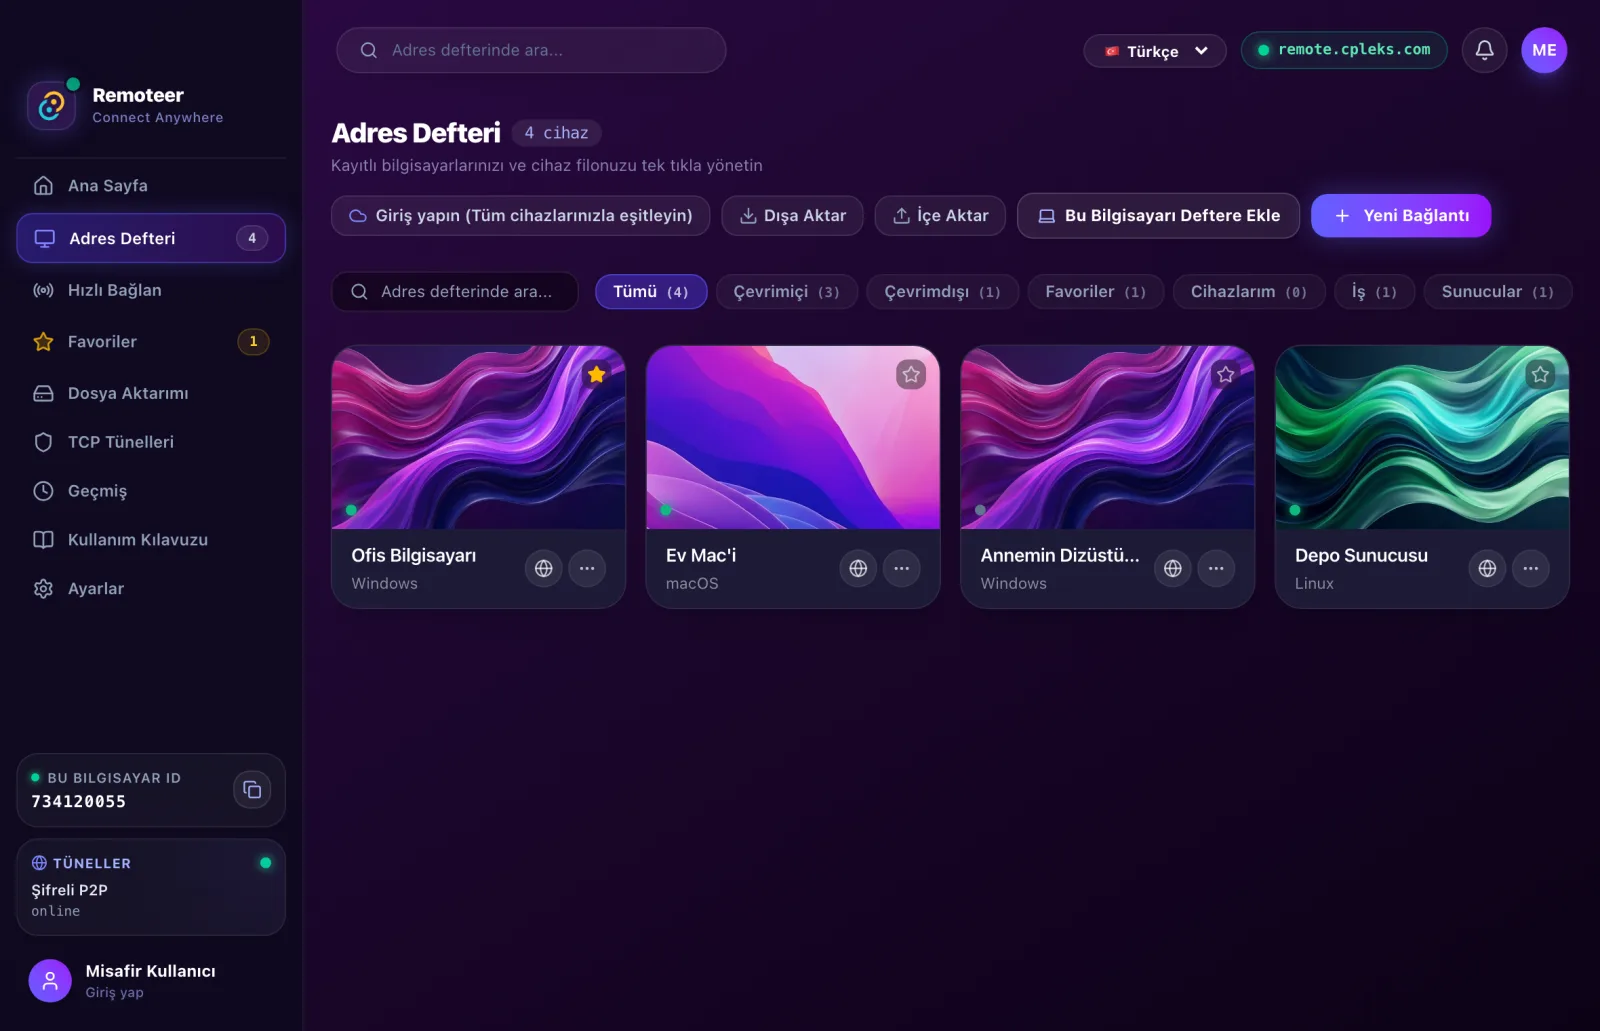
Bilgisayarlarınızı adla, grupla ve kodlarıyla saklar; hesabınızla girdiğiniz her cihazda aynıdır. Kodlar sizin cihazınızda parolanızla şifrelenir, sunucu açamaz. Adres defteri Pro planındadır.
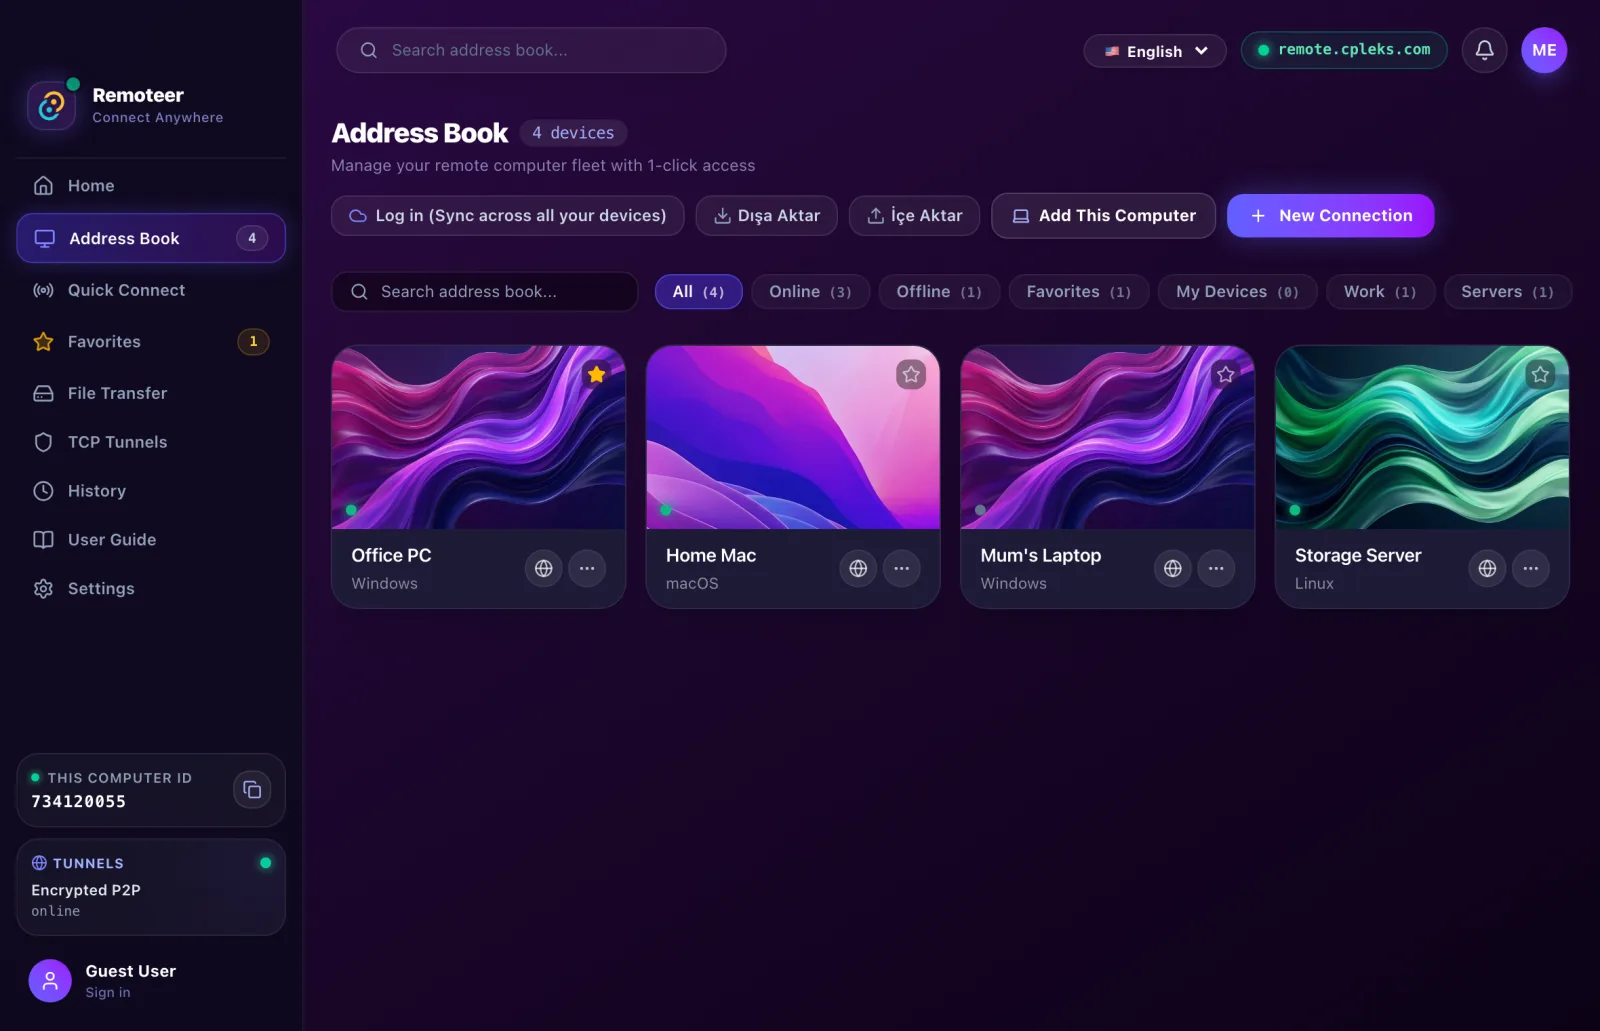
Keeps your computers by name, group and code, the same on every device you sign in on. Codes are sealed on your device with your password; the server cannot open them. The address book is part of Pro.
7. Gözetimsiz erişim7. Unattended access
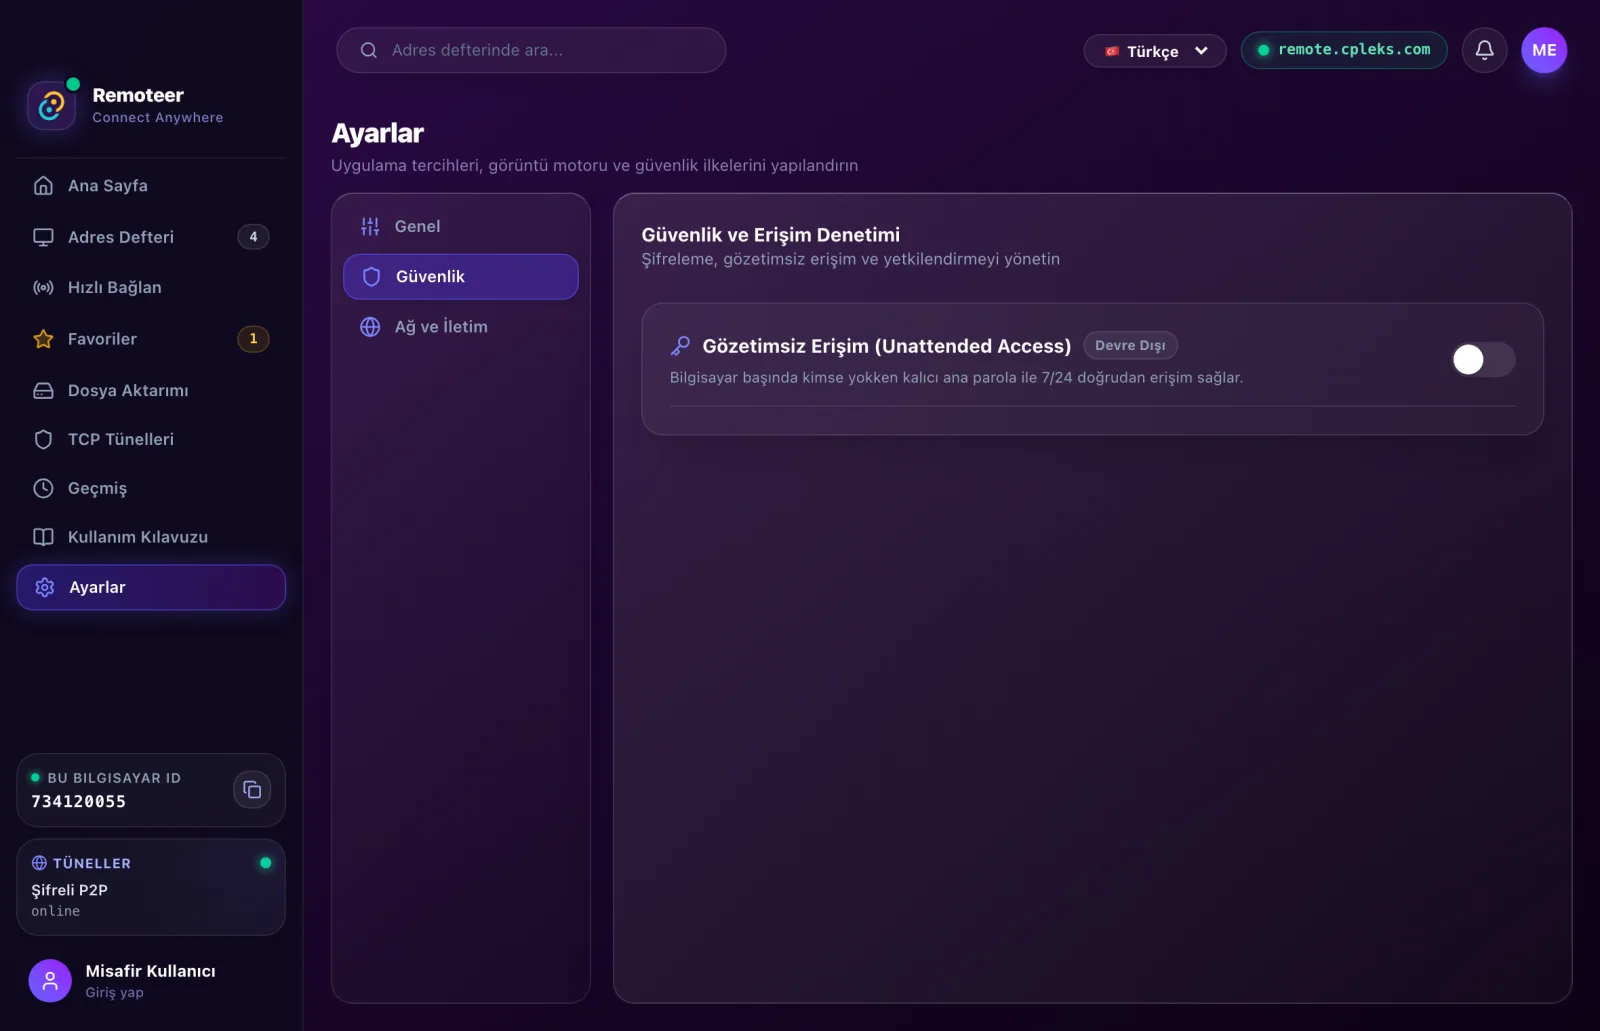
- Bağlanacağınız bilgisayarda (örneğin ofis bilgisayarı) Ayarlar → Güvenlik'i açın.
- Gözetimsiz Erişim'i açıp güçlü bir parola belirleyin ve kaydedin.
- Artık başında kimse yokken de bu parolayla veya kendi hesabınızla bağlanırsınız. Kapalıyken her bağlantı bilgisayarın başındaki kişiye sorulur.
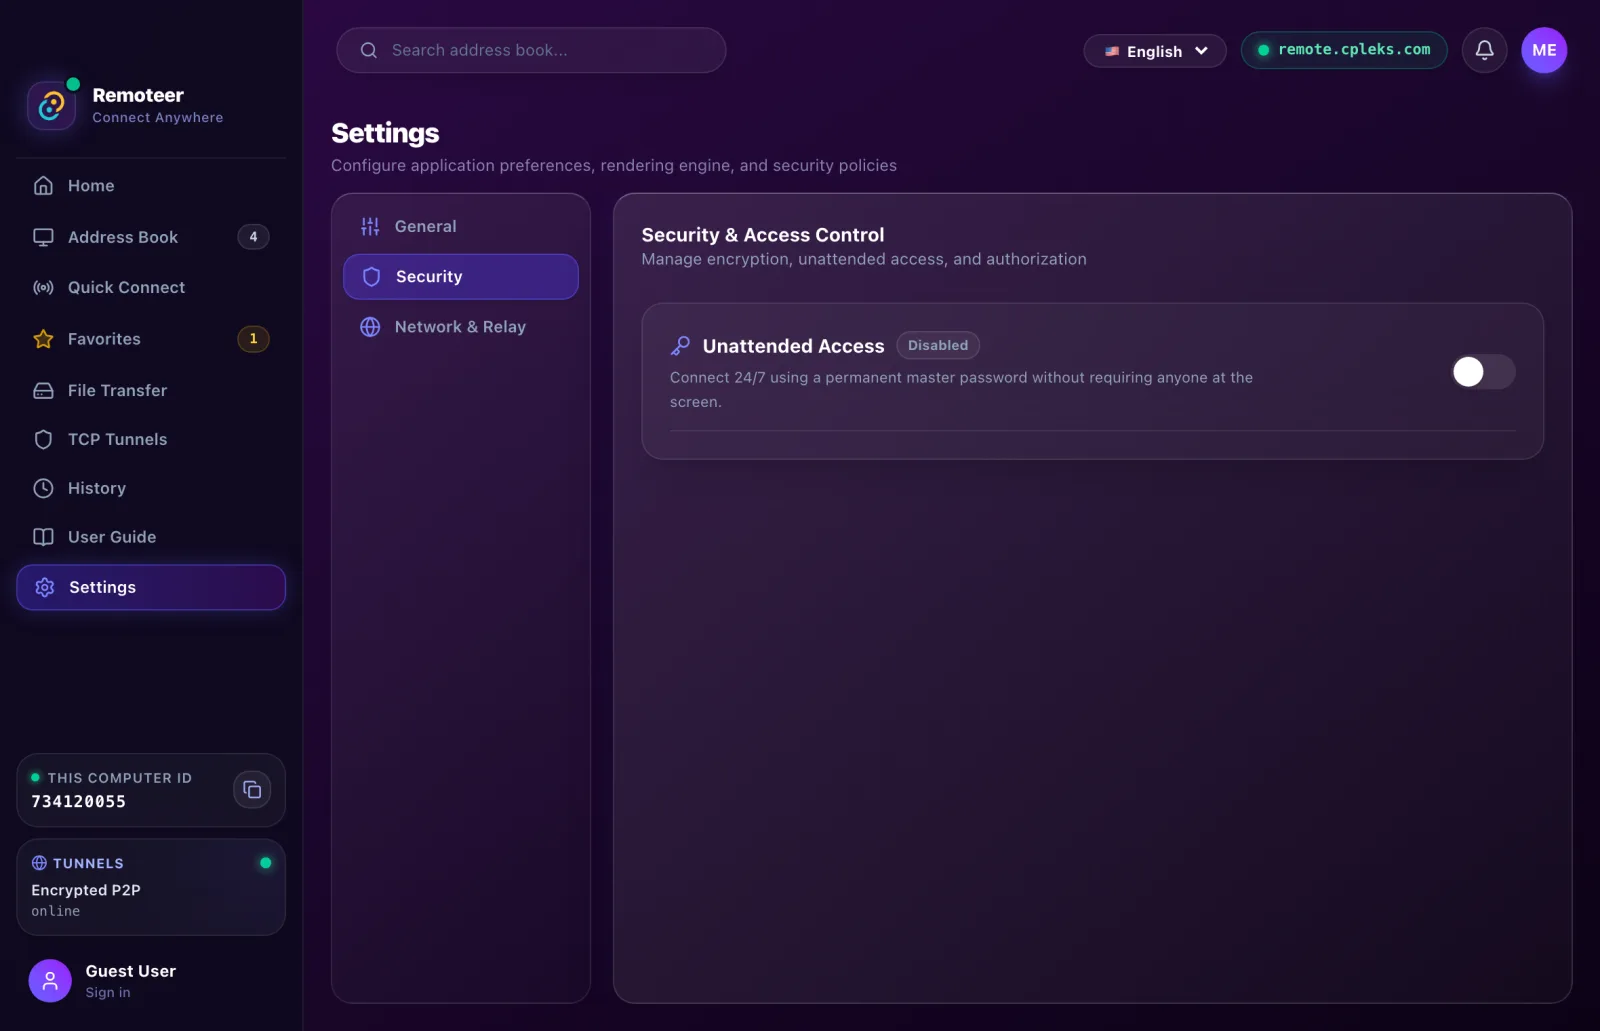
- On the computer you will connect to (say, the office PC), open Settings → Security.
- Turn on Unattended Access, choose a strong password and save it.
- From then on you connect with that password or your own account even when nobody is there. While it is off, every connection is asked of the person at the computer.
8. Dosya aktarımı8. File transfer
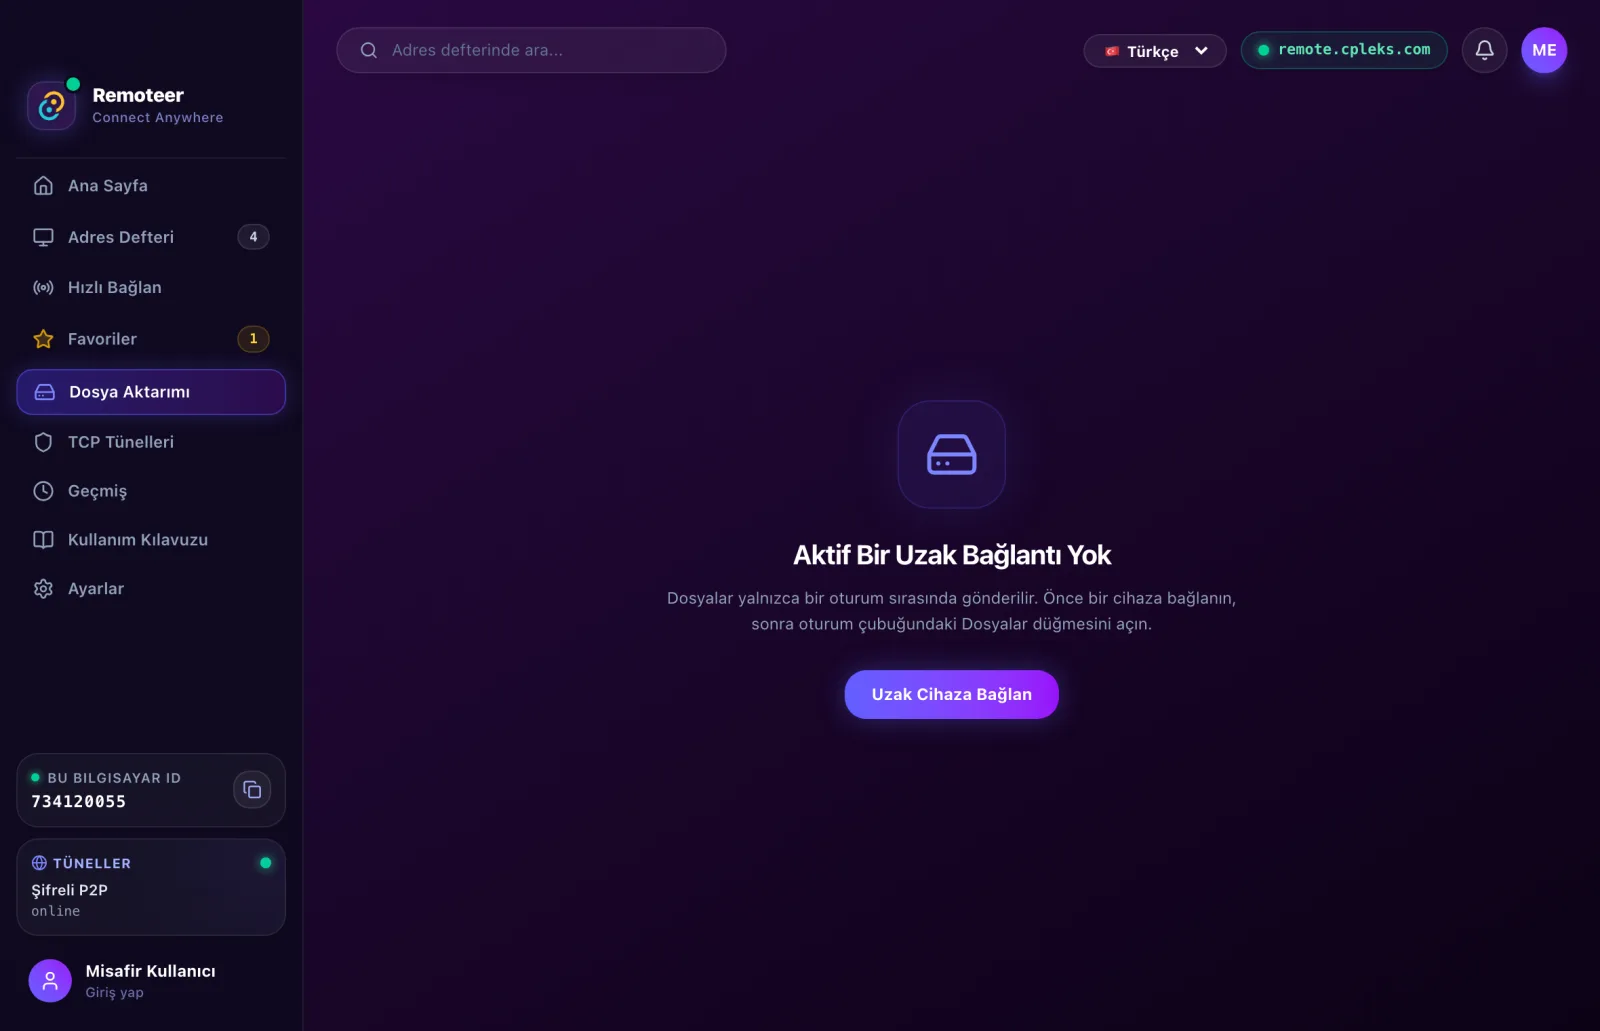
Dosyalar bir oturum sırasında gider: oturum çubuğundaki Gönder'e basın. Solda bu bilgisayar, sağda uzak bilgisayar; sürükleyip bırakın. Boyut sınırı yoktur ve dosyalar iki cihaz arasında şifreli olarak doğrudan akar. Yalnızca dosya için bağlanmak da mümkündür (adres defterindeki Dosyalar).
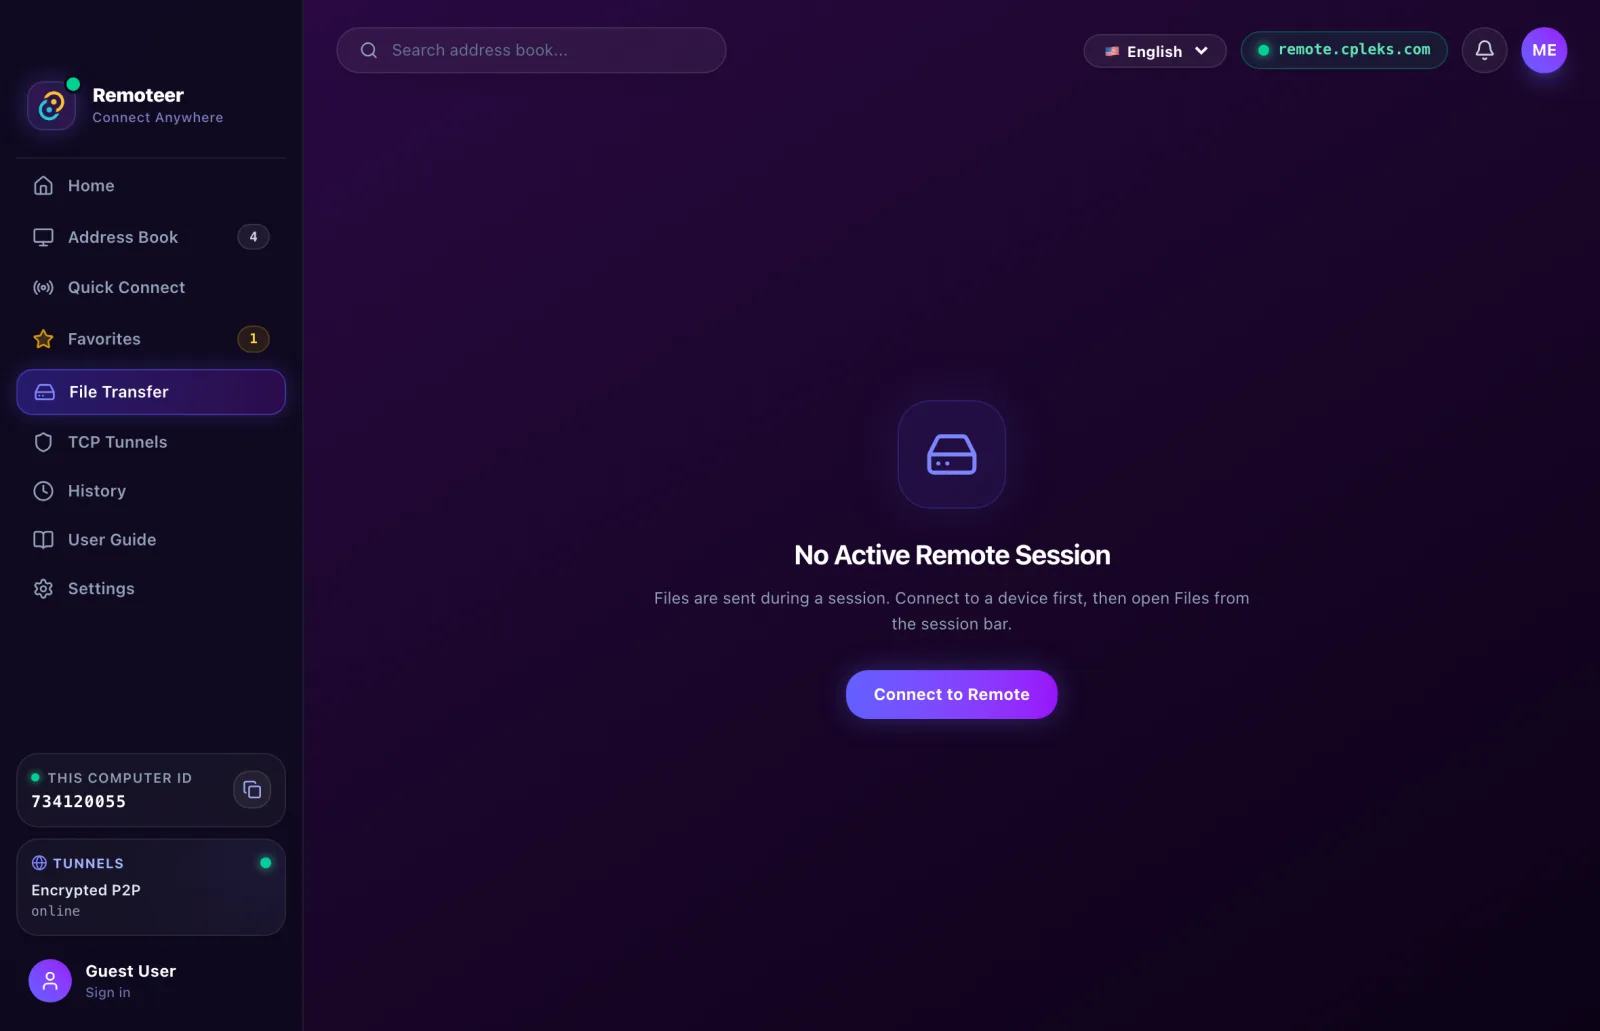
Files go during a session: press Send in the session bar. This computer on the left, the remote one on the right; drag and drop. There is no size limit, and files flow encrypted straight between the two devices. You can also connect for files only (Files in the address book).
9. TCP Tünelleri9. TCP tunnels
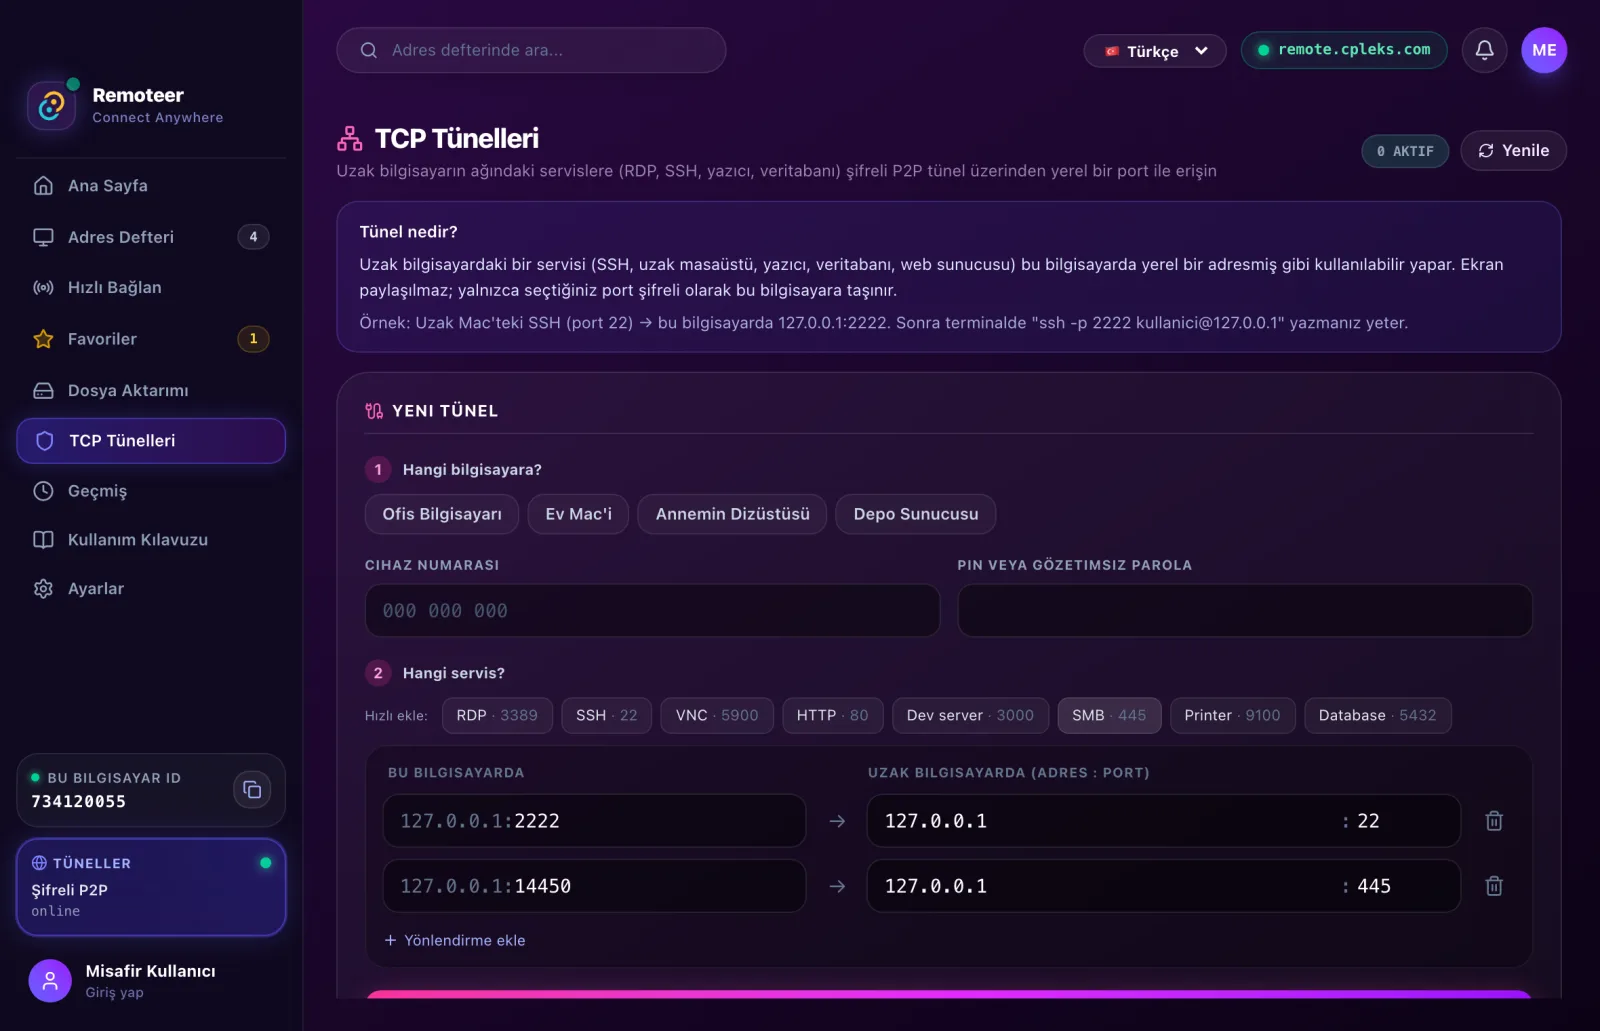
Bir tünel, uzak bilgisayarın ağındaki tek bir servisi (paylaşılan klasör, yazıcı, NAS paneli, SSH, veritabanı) bu bilgisayarda yerel bir adres gibi kullanmanızı sağlar. Bu bir VPN değildir: ağın tamamı değil, seçtiğiniz port taşınır.
Örnek: ofisteki NAS'ın web paneline (192.168.1.50) evden erişmek
- Ofis bilgisayarında Remoteer açık, hesabınızla giriş yapılmış ve gözetimsiz erişim açık olsun.
- Evdeki bilgisayarda TCP Tünelleri'ni açın; Hangi bilgisayara? altında ofis bilgisayarını seçin (parolayı boş bırakırsanız hesabınızla bağlanır).
- Hangi servis? altında Yönlendirme ekle: Uzak bilgisayarda 192.168.1.50 : 80, Bu bilgisayarda 8080. (127.0.0.1 ofis bilgisayarının kendisidir.)
- Tüneli Başlat'a basın ve tarayıcıda http://127.0.0.1:8080'i açın.
Hazır düğmeler: ofis bilgisayarının paylaşılan klasörleri için SMB (Mac'te Finder → Cmd+K → smb://127.0.0.1:14450), yazıcı için Printer, ayrıca SSH, RDP, VNC ve veritabanı.
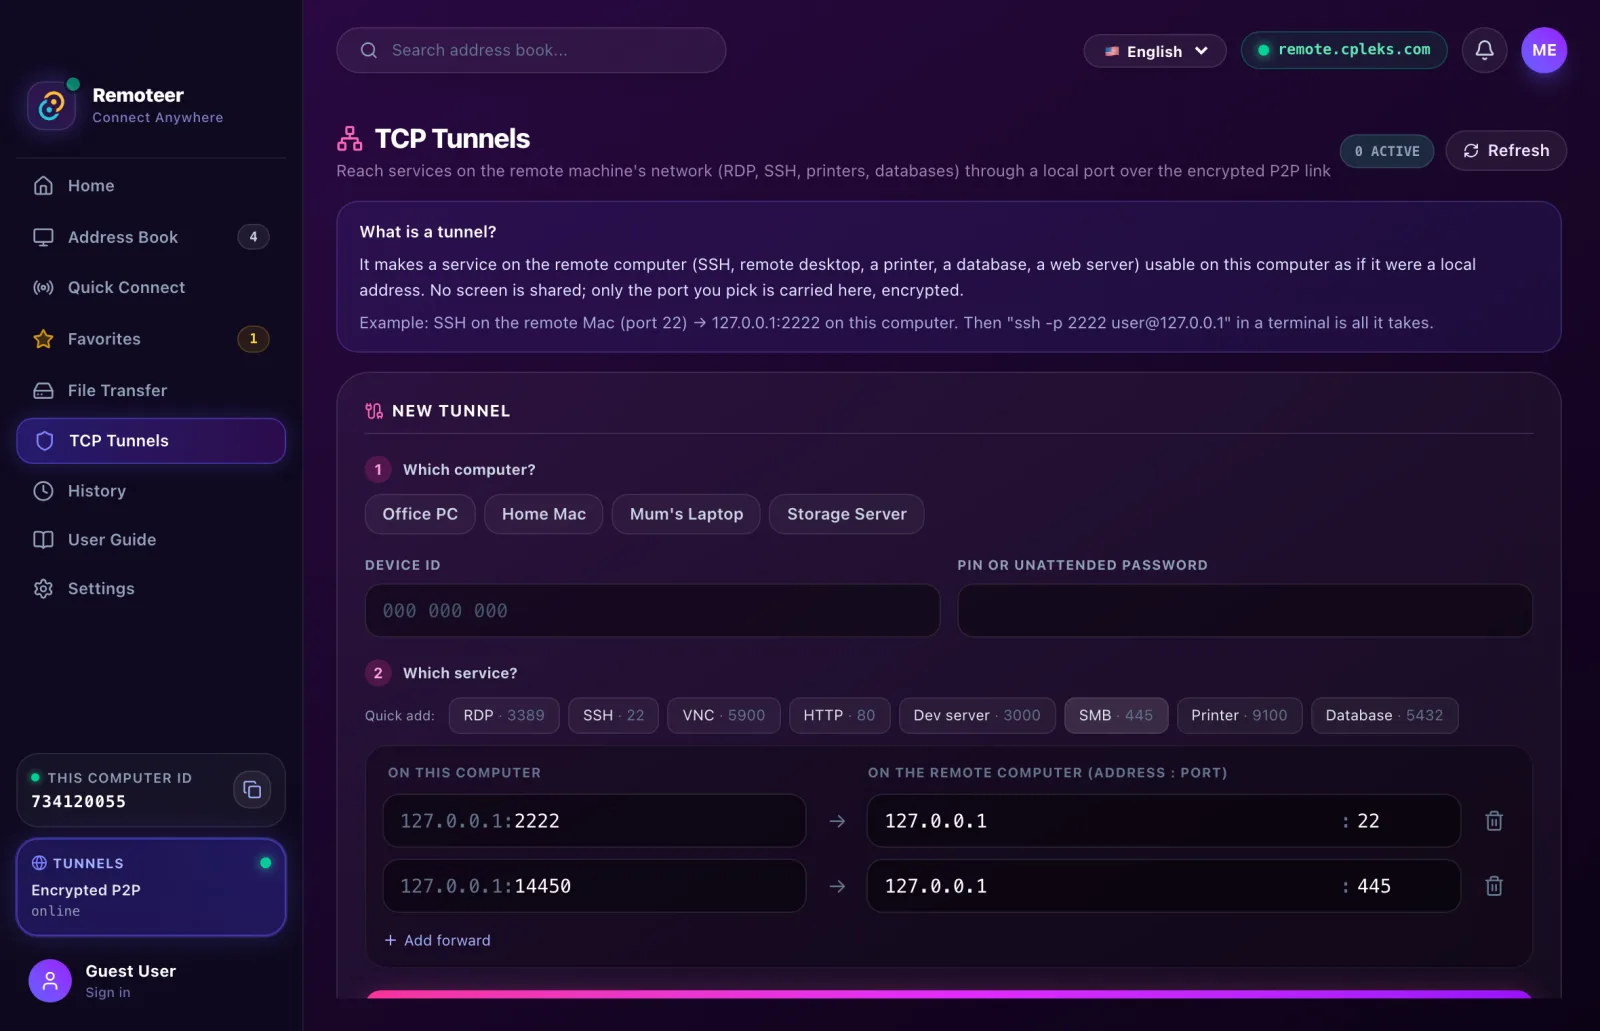
A tunnel lets you use one service of the remote computer's network (a shared folder, a printer, a NAS panel, SSH, a database) on this computer as a local address. It is not a VPN: only the port you pick is carried, not the whole network.
Example: the office NAS's web panel (192.168.1.50) from home
- On the office PC, Remoteer is running, signed in to your account, with unattended access on.
- At home, open TCP Tunnels; under Which computer? pick the office PC (leave the password empty to use your account).
- Under Which service?, Add forward: On the remote computer 192.168.1.50 : 80, On this computer 8080. (127.0.0.1 is the office PC itself.)
- Press Start tunnel and open http://127.0.0.1:8080 in your browser.
Quick buttons: SMB for the office PC's shared folders (on a Mac: Finder → Cmd+K → smb://127.0.0.1:14450), Printer, plus SSH, RDP, VNC and databases.
10. Hesap ve planlar10. Account and plans
- Başka bir bilgisayara bağlanmak için hesap gerekir; yalnızca destek alan bilgisayarın hesaba ihtiyacı yoktur.
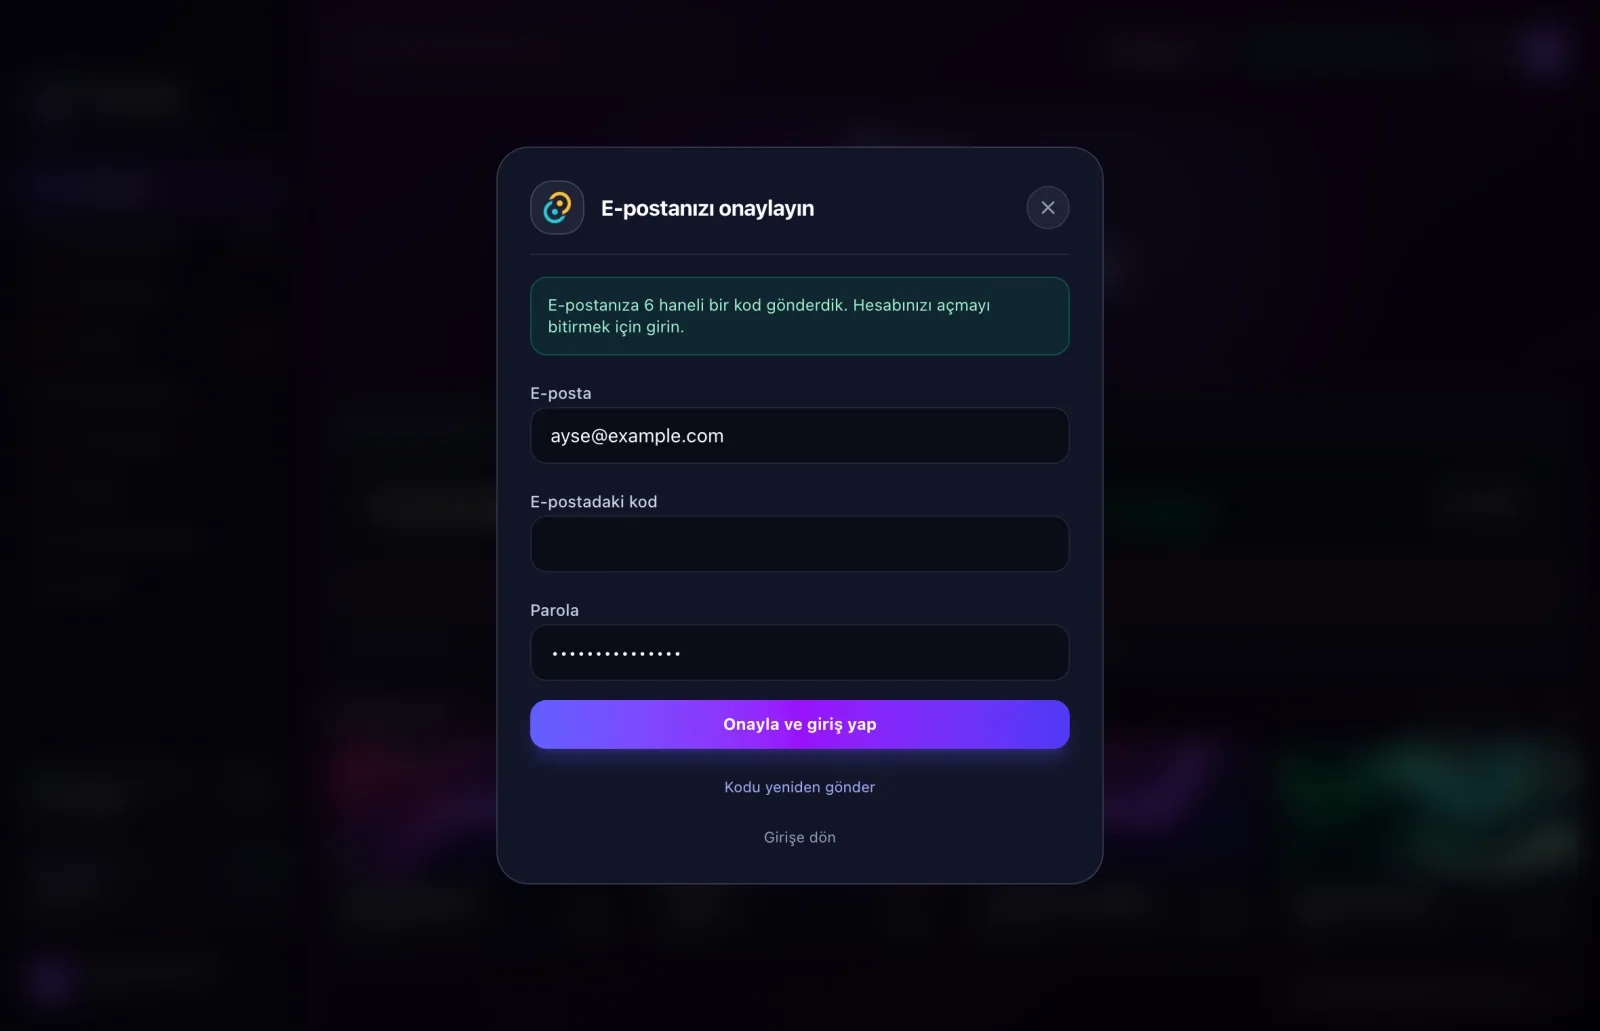
- Hesap açınca e-postanıza 6 haneli bir kod gelir: hesabınızı onaylamak için girin. Kod gelmediyse Kodu yeniden gönder.
- Ücretsiz: oturum başına 15 dakika (bitince hemen yeniden bağlanabilirsiniz), adres defteri yok. Pro: süre sınırı yok, 50 cihazlık adres defteri, ilk yardım linkleri.
- Hesabınızı, planınızı, faturalarınızı ve parolanızı sitede giriş yapıp üstte adınıza tıklayınca açılan panelden yönetirsiniz.
- Connecting to another computer needs an account; a computer that only receives help needs none.
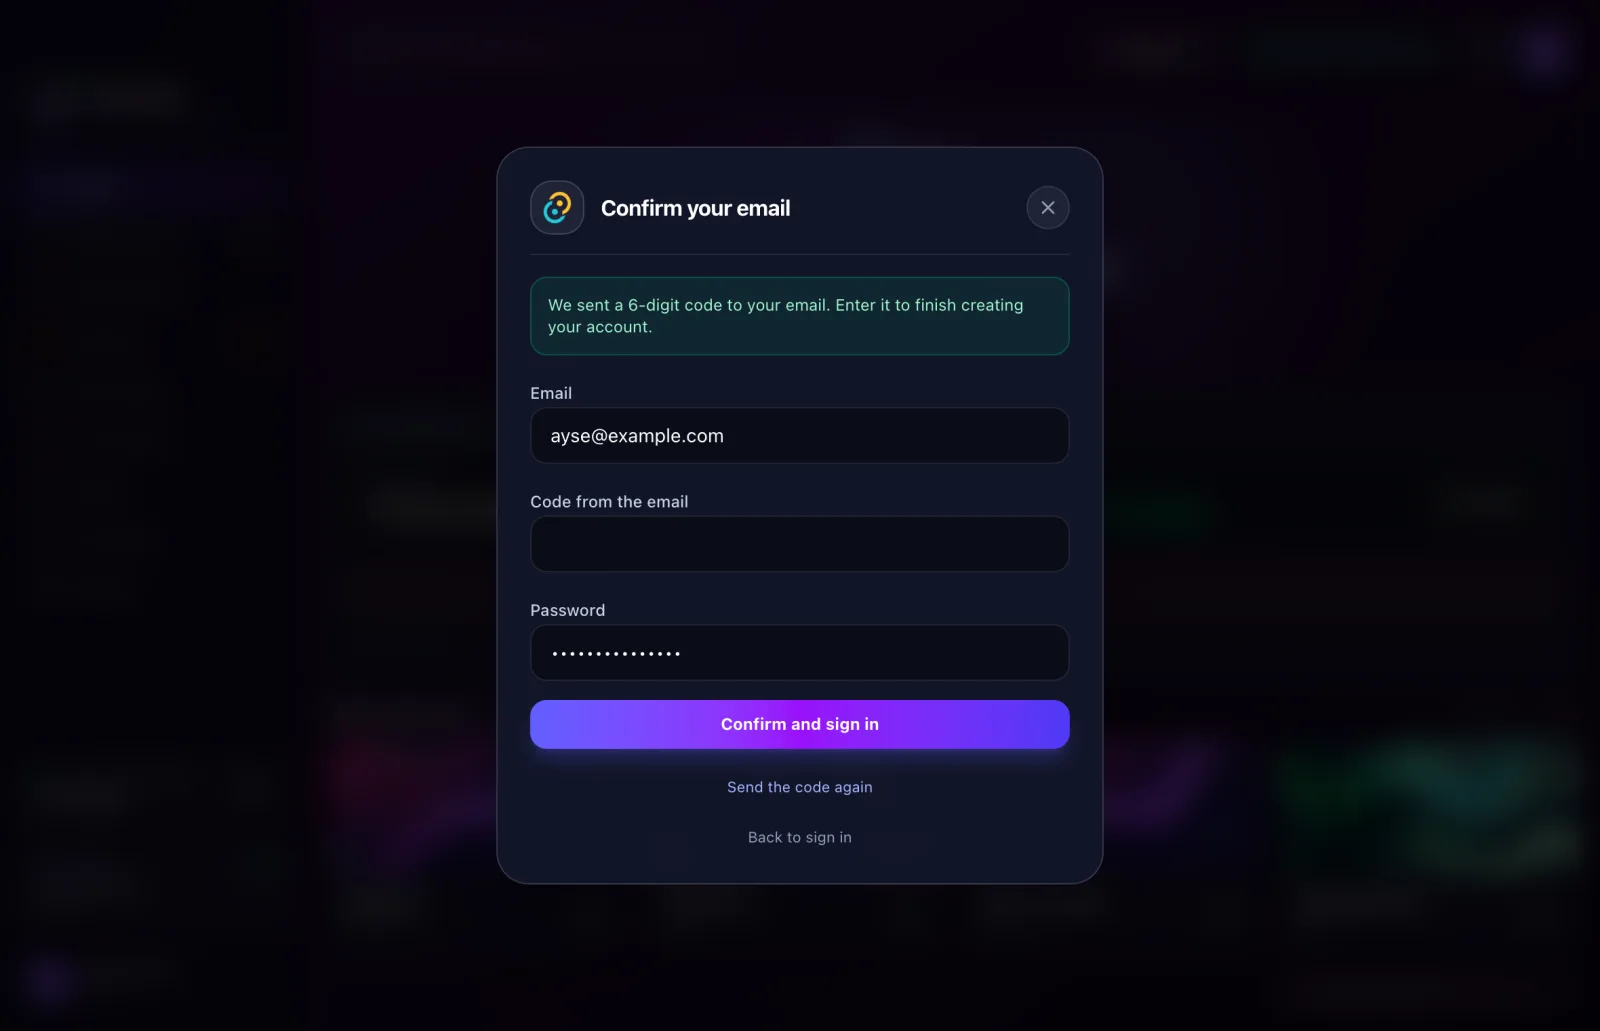
- When you create an account, a 6-digit code arrives by email: enter it to confirm the account. If it doesn't arrive, Send the code again.
- Free: 15 minutes per session (connect again right away when it ends), no address book. Pro: no time limit, a 50-device address book, first-aid links.
- Manage your account, plan, invoices and password on the website: sign in and click your name at the top.
11. Web istemcisi ve telefon11. Web client and phone
Uygulama kurmadan da bağlanabilirsiniz: remote.cpleks.com/app adresini Chrome, Edge veya Safari'de açın, giriş yapın ve numarayı girin. Telefonda parmak bir dokunmatik yüzey gibi çalışır: sürükleyin, dokunarak tıklayın, iki parmakla kaydırın.
You can connect without installing anything: open remote.cpleks.com/app in Chrome, Edge or Safari, sign in and enter the ID. On a phone your finger works like a trackpad: drag, tap to click, scroll with two fingers.
12. Sorun giderme12. Troubleshooting
- Mac'te siyah ekran veya fare çalışmıyor: Sistem Ayarları → Gizlilik ve Güvenlik'te Remoteer için Ekran Kaydı ve Erişilebilirlik açık olmalı.
- Görüntü takılıyor: Mac Wi-Fi'daysa, kablo kullanın ve Wi-Fi'ı kapatın ya da modemin 5 GHz kanalını 44 yapın. Oturum çubuğundaki dalga simgesi bağlantının ayrıntılarını gösterir.
- Bağlanamıyorum: iki tarafta da Remoteer açık ve çevrimiçi olmalı (ana sayfada yeşil "Çevrimiçi").
- Destek: Ayarlar → Genel → Destek günlüğü ile kayıt dosyasını açıp support@remote.cpleks.com adresine gönderin.
- Black screen or no mouse on a Mac: in System Settings → Privacy & Security, Screen Recording and Accessibility must be on for Remoteer.
- The picture stutters: if the Mac is on Wi-Fi, use a cable with Wi-Fi off, or set the router's 5 GHz channel to 44. The wave icon in the session bar shows the connection's details.
- I can't connect: Remoteer must be open and online on both sides (green "Online" on the home screen).
- Support: open the log with Settings → General → Support log and send it to support@remote.cpleks.com.